Introduction:
With the continuous advancement of technology in the modern automotive repair and diagnostic field, many car owners and technicians are now able to conduct in-depth analysis and repairs on vehicles using specialized diagnostic tools. MDARS (Mazda Diagnostic and Repair Software), as the official diagnostic software for Mazda, provides strong support for both car owners and technicians, especially in areas such as ECU module updates, fault code clearing, and system reprogramming. However, despite the convenience that this tool offers, the complexity of the update process and potential risks often cause hesitation among users.
This article will share my personal experience of updating the ECU module on the Mazda CX-90 Turbo S PP using MDARS, helping both car owners and technicians better understand and operate this software. Please note that the process described in this article is for reference only, and users should proceed at their own risk, especially when dealing with vehicles under open recall. Additionally, ensuring the proper hardware setup, a stable power supply, and a reliable internet connection are key to successfully completing the update.
I want to share my experience updating the ECU modules on my CX-90 Turbo S PP using MDARS (Mazda Diagnostic and Repair Software). I share this to encourage others to try it, but as a warning/disclaimer: you do so at your own risk. Also: Do not update vehicles that are under open recall. Let the dealership handle updates because they need to record that the recall work has been completed, or it will continue to show as an open recall. During the update, significant issues are unlikely since MDARS has built-in safeguards to prevent problems. Please ensure you provide sufficient power to both the vehicle and computer during the update process—more details below.
Additionally, when I couldn't wait for an OTA update, I've used FDRS (Ford’s equivalent to MDARS) many times to update my Mustang Mach E. Unlike our CX-90, the Mach E can receive various updates via OTA. For our vehicles, many updates can only be done using MDARS, which typically means going to the dealership, and if there are no issues, recalls, or service bulletins, the dealership is unlikely to update your CX-90. So, for those interested, here's my approach.
What you need:
-
A Windows laptop running Windows 10. Mine is Windows 10. Make sure you can plug it into a power source when it's in your car and sleep mode is off.
-
An internet connection available on your laptop when connected to the CX-90. MDARS needs a strong Wi-Fi or Ethernet connection throughout the process.
-
VCM-II Adapter. This is the expensive part, but also not the place to skimp. Mazda makes its own $2400 adapter or recommends two other commercial-grade adapters that are equally pricey. However, Ford’s legacy ownership of Mazda means I was able to use my $540 Ford-specific Mongoose Plus J2534 adapter, but the Ford/Mazda VCX Nano also seems to work and costs under $90—much cheaper than the Mongoose. Warning: There are many random eBay and AliExpress VCM-II adapters claiming to work with Mazda. I would avoid those. The price may be tempting, but the updates may not work well. These very cheap devices are best suited for reading DTC codes.
-
DC power supply. During the sometimes lengthy update process, you'll need to maintain 12V battery power. A 5-amp trickle charger won’t be enough. The output voltage should be 13.8V.
-
MDARS Software, which costs $50 for 72 hours of use. You need to create a Mazda service account to purchase the license, and create a second account when logging into MDARS for the first time. Make sure both accounts use the same email address.
Now, let’s start the update process!
Just a reminder – while this process is designed to be very safe, you still do so at your own risk!
First, connect the power. I clipped the positive terminal under the flip-up cover, and the negative terminal was connected to the black cable attached to the body. Do not connect the negative terminal to the battery itself! When connecting the negative, you may see a little spark, but that's normal.
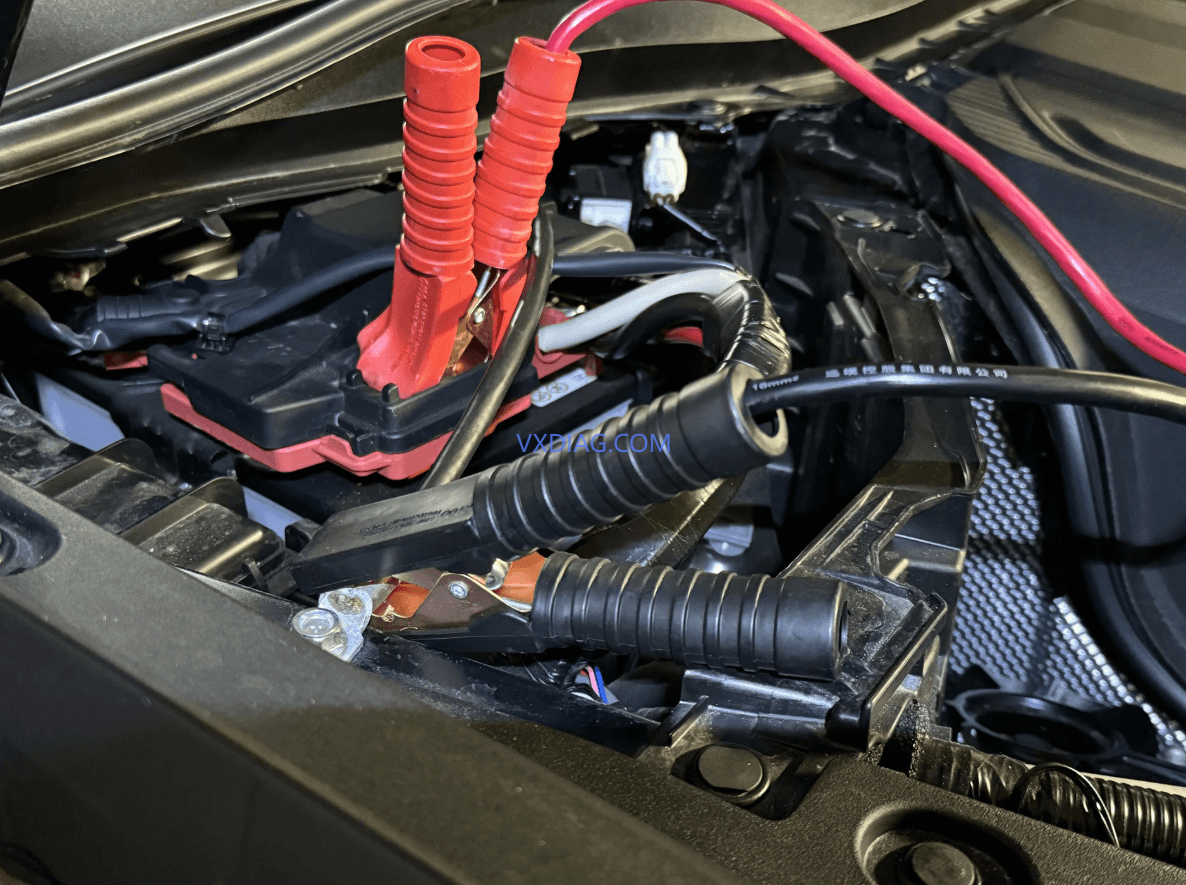
After connecting the power, take your laptop with the plugged-in power and enter the cabin, then connect the NANO FORD (aka J2534 pass-thru, VCI device, whatever you call it) to the OBD2 port of the CX-90.
Now, you can press the CX-90’s start button twice without pressing the brake to put it into ACC mode. Time to launch MDARS. On the login screen, you'll use the second account you created (not the mazdaserviceinfo.com account). Click to log in, and you’ll see a screen that detects your VCI adapter. Unfortunately, I didn’t capture a screenshot when connecting the VCI device for the first time, but if I remember correctly, I selected the lower option from the two on the right side of the screen, and there I found my VXDIAG NANO.
The next screen is the connection screen, with four circular icons in the middle. The top three will quickly turn green, but the bottom icon will take about 30 seconds.
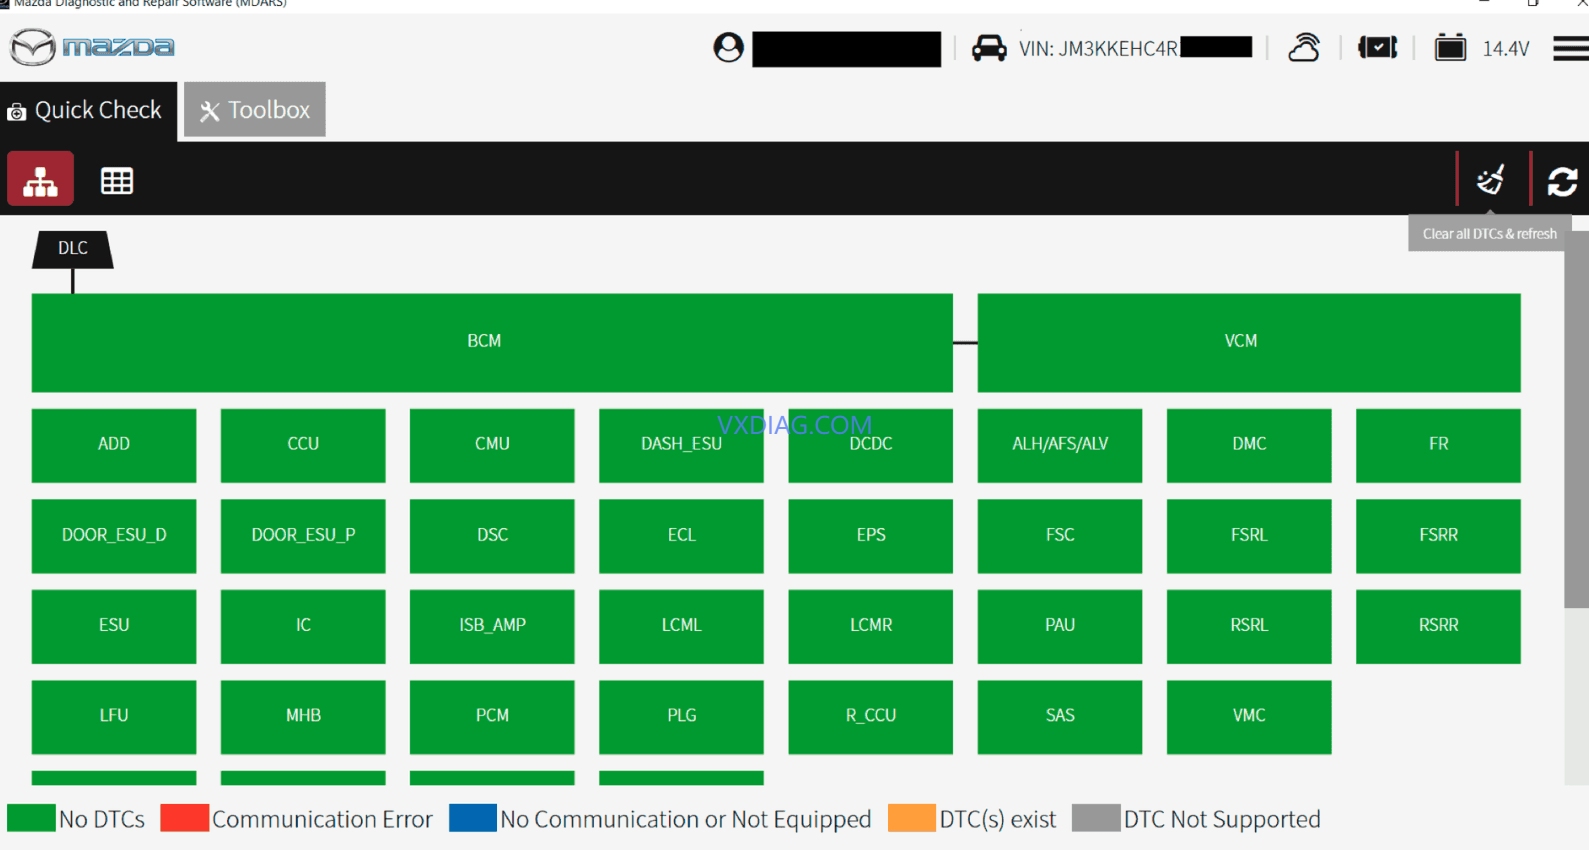
Next, you'll get a progress bar, and MDARS will read your CX-90's configuration. That takes about a minute, and MDARS will load the page above, showing the status of all your modules. You can also clear DTCs by clicking the broom icon in the top right. To start the update, click the "Toolbox" tab at the top left.

After clicking the “Toolbox,” click the car icon with the wrench in the upper left.
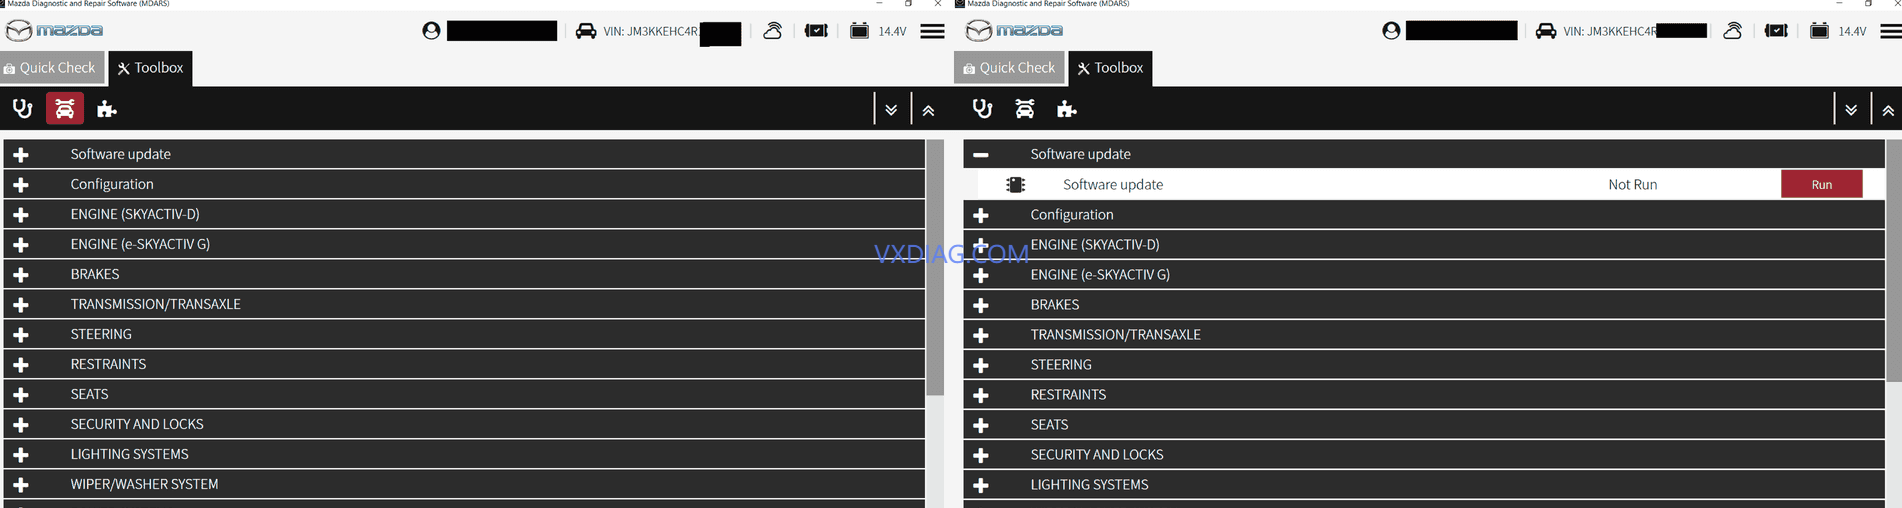
Next, you'll see “Software Updates” at the top. Click that, and then choose "Run."
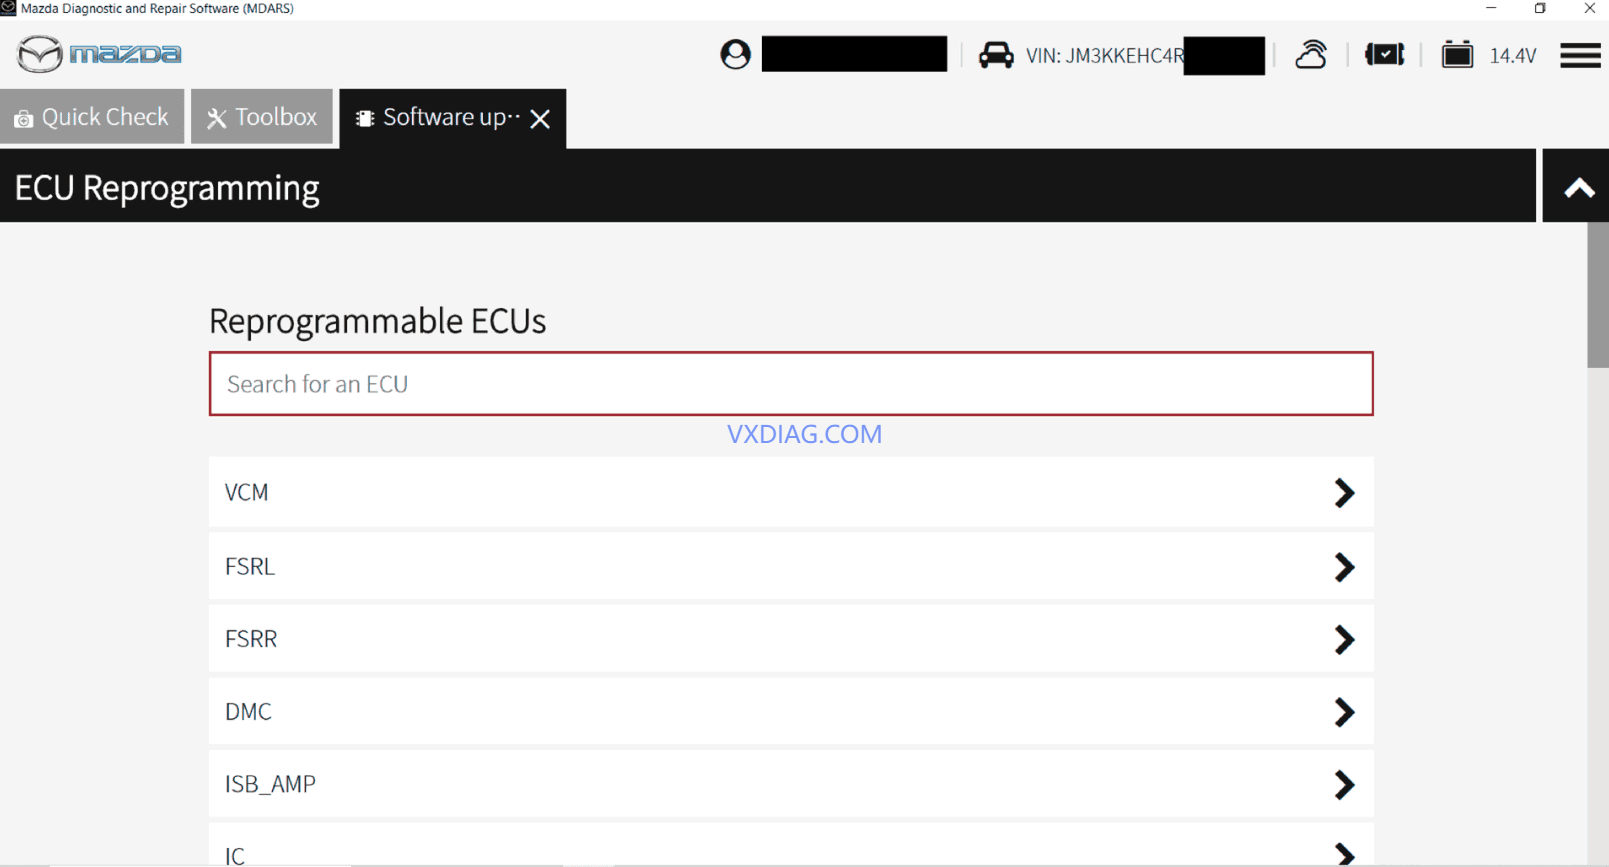
Next, you’ll get a list of the ECUs (modules) that MDARS can check for updates. Click one and get started. I just went down the list from the top. Unfortunately, unlike Ford's FDRS, MDARS doesn’t scan all modules for updates at once. Instead, you have to click through each module to check.
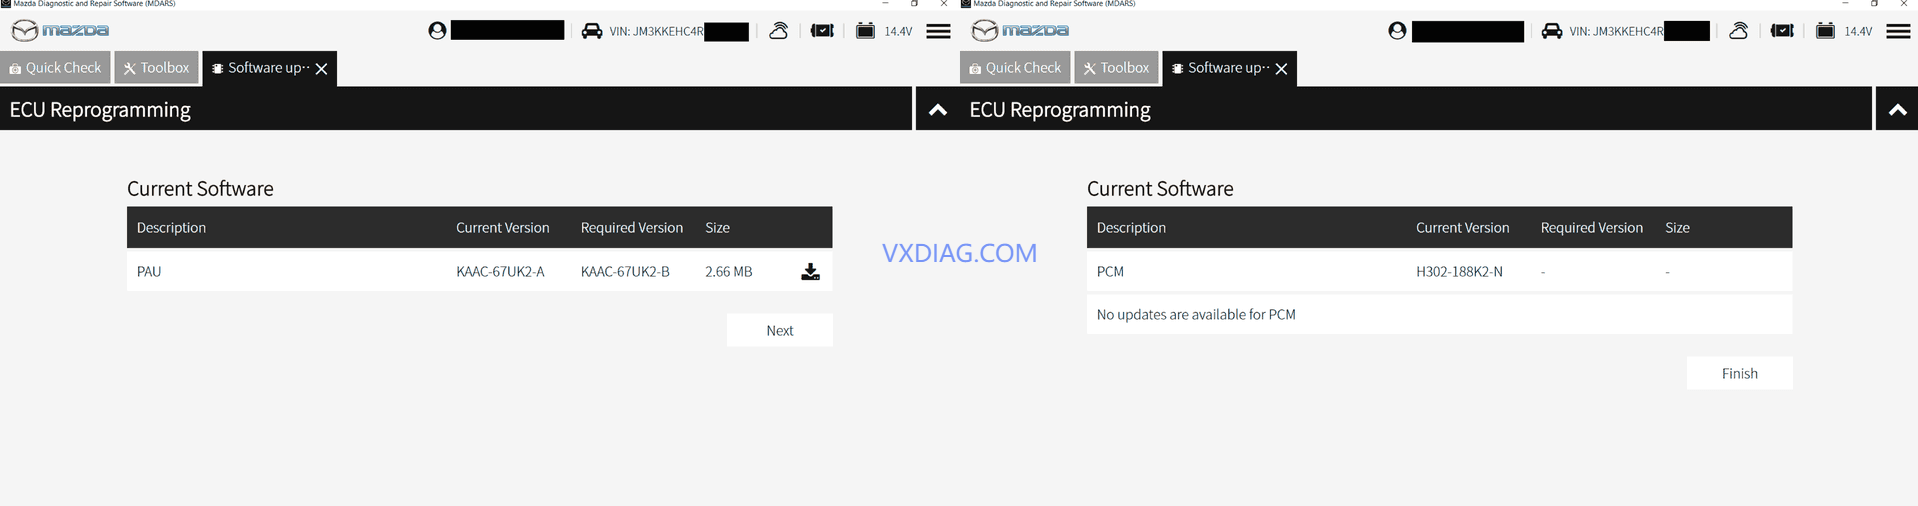
Once you choose a module, MDARS will check to see if there's an update. If there is, you'll get the screen on the left, and clicking "Next" will download the update files and get you started. If MDARS tells you there’s no update available – I found this to be the case for most modules – clicking next will kick you back to the toolbox menu, where you’ll click “Software Updates” again and continue to the next module.

If there’s an update to install, MDARS will quickly download it, and then a couple of screens with checkboxes will appear. You have to check all the boxes on each screen to click “Next,” and then the update will begin.
Some updates complete without any user intervention. Others may require you to turn off the ignition at some point or perform a “Special Ignition,” where you remove the key from the car, press the Start/Stop button once, wait until the dash lights up (ignore the “No key” message that initially pops up), and then push Start/Stop again a few seconds later. The updates that required this typically made me do the Special Ignition four times in a row to complete the update.
Some updates take hours (luckily, only a few), while others take a few minutes. Note that the progress bar is not linear at all. Sometimes it only moves 3 or 4 times during the update, jumping 20% or more each time. Don’t worry if it doesn’t move for 20 or 30 minutes during some updates. Patience is key.
Also, the SAS module that controls the airbags cannot be updated. It will show an update, but it will error out. Given what it controls, you should leave it alone.

Mazda's programming PDF offers the following post-programming steps for confirming successful programming:
Select “Vehicle History” under “Collect Diagnostic Information,” then click “Run.”
Confirm the reprogramming on the screen and save the screen copy as a record.
Good luck!